简单的说一下线程池
线程池 Thread Pool
线程池是一种池化的技术,类似的还有数据库连接池、HTTP 连接池等等。
池化的思想主要是为了减少每次获取和结束资源的消耗,提高对资源的利用率。
比如食堂卖早饭的阿姨,每个人去买早饭阿姨都需要临时帮你拿袋子装起来,如果阿姨提前把事物装起来,等你来买的时候就直接把事物给你,是不是就节省时间了呢。
线程池同理,正是因为每次创建、销毁线程需要占用太多系统资源,所以我们建这么一个池子来统一管理线程。用的时候从池子里拿,不用了就放回来,也不用你销毁,是不是方便了很多?
线程池的好处
进程会申请资源,拿来给线程用,所以线程是很占用系统资源的,那么我们用线程池来统一管理线程就能够很好的解决这种资源管理问题。
比如因为不需要创建、销毁线程,每次需要用的时候我就去拿,用完了之后再放回去,所以节省了很多资源开销,可以提高系统的运行速度。
而统一的管理和调度,可以合理分配内部资源,根据系统的当前情况调整线程的数量。
那总结来说有以下 3 个好处:
- 降低资源消耗:通过重复利用现有的线程来执行任务,避免多次创建和销毁线程。
- 提高相应速度:因为省去了创建线程这个步骤,所以在拿到任务时,可以立刻开始执行。
- 提供附加功能:线程池的可拓展性使得我们可以自己加入新的功能,比如说定时、延时来执行某些线程。
实现线程池
那么接下来我就来实现一个简单的自定义线程池
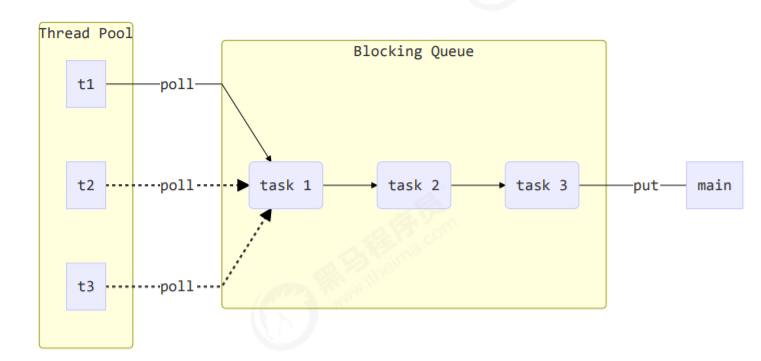
可以看到我们有3个组件,Thread Pool是线程池,Bloking Queue是一个阻塞队列,它体现的是生产者消费者模式下平衡它们之间速度的一个组件,线程池相当于一个消费者可以不断的获取任务来执行任务,main相当于一个生产者,可以源源不断的生产任务。
搭建必须的环境
我使用maven环境来搭建项目,首先需要在pom文件里添加依赖
pom文件
1
2
3
4
5
6
7
8
9
10
11
12
13
14
15
16
17
18
19
20
21
22
23
24
25
26
27
28
29
30
31
32
33
34
35
36
37
38
39
40
41
42
43
44
45
46
47
48
49
50
51
| <?xml version="1.0" encoding="UTF-8"?>
<project xmlns="http://maven.apache.org/POM/4.0.0"
xmlns:xsi="http://www.w3.org/2001/XMLSchema-instance"
xsi:schemaLocation="http://maven.apache.org/POM/4.0.0 http://maven.apache.org/xsd/maven-4.0.0.xsd">
<modelVersion>4.0.0</modelVersion>
<groupId>com.xn</groupId>
<artifactId>threadtest</artifactId>
<version>1.0-SNAPSHOT</version>
<properties>
<maven.compiler.source>1.8</maven.compiler.source>
<maven.compiler.target>1.8</maven.compiler.target>
</properties>
<dependencies>
<dependency>
<groupId>com.fasterxml.jackson.core</groupId>
<artifactId>jackson-databind</artifactId>
<version>2.10.0</version>
</dependency>
<dependency>
<groupId>org.projectlombok</groupId>
<artifactId>lombok</artifactId>
<version>1.18.10</version>
</dependency>
<dependency>
<groupId>org.springframework</groupId>
<artifactId>spring-context</artifactId>
<version>5.2.0.RELEASE</version>
</dependency>
<dependency>
<groupId>org.springframework</groupId>
<artifactId>spring-webmvc</artifactId>
<version>5.2.0.RELEASE</version>
</dependency>
<dependency>
<groupId>ch.qos.logback</groupId>
<artifactId>logback-classic</artifactId>
<version>1.2.3</version>
</dependency>
<dependency>
<groupId>mysql</groupId>
<artifactId>mysql-connector-java</artifactId>
<version>5.1.48</version>
</dependency>
<!-- <dependency>-->
<!-- <groupId>org.openjdk.jol</groupId>-->
<!-- <artifactId>jol-core</artifactId>-->
<!-- <version>.</version>-->
<!-- </dependency>-->
</dependencies>
</project>
|
我们需要logback来做日志,方便我们查看运行后的线程状态
添加logback.xml
logback.xml文件
1
2
3
4
5
6
7
8
9
10
11
12
13
14
15
16
17
18
19
20
21
22
23
24
25
26
27
28
29
30
| <?xml version="1.0" encoding="UTF-8"?>
<configuration
xmlns="http://ch.qos.logback/xml/ns/logback"
xmlns:xsi="http://www.w3.org/2001/XMLSchema-instance"
xsi:schemaLocation="http://ch.qos.logback/xml/ns/logback logback.xsd">
<appender name="STDOUT" class="ch.qos.logback.core.ConsoleAppender">
<encoder>
<!--%date{HH:mm:ss.SSS} %c -->
<pattern>%date{HH:mm:ss.SSS} %c [%t] - %m%n</pattern>
</encoder>
</appender>
<!--<logger name="org.springframework.security.web.FilterChainProxy" level="DEBUG" additivity="false">
<appender-ref ref="STDOUT"/>
</logger>
<logger name="org.springframework.security.web.access.intercept.FilterSecurityInterceptor" level="DEBUG" additivity="false">
<appender-ref ref="STDOUT"/>
</logger>-->
<!--<logger name="org.springframework.security.web" level="DEBUG" additivity="false">
<appender-ref ref="STDOUT"/>
</logger>-->
<logger name="c" level="debug" additivity="false">
<appender-ref ref="STDOUT"/>
</logger>
<root level="ERROR">
<appender-ref ref="STDOUT"/>
</root>
</configuration>
|
编写Blocking Queue
环境已经准备就绪,我们可以开始实现任务队列了。
1
2
3
4
5
6
7
8
9
10
11
12
13
14
15
16
17
18
19
20
21
22
23
24
25
26
27
28
29
30
31
32
33
34
35
36
37
38
39
40
41
42
43
44
45
46
47
48
49
50
51
52
53
54
55
56
57
58
59
60
61
62
63
64
65
66
67
68
69
70
| class BlockingQueue<T>{
private Deque<T> queue = new ArrayDeque<>();
private ReentrantLock lock = new ReentrantLock();
private Condition fullWaitSet = lock.newCondition();
private Condition emptyWaitSet = lock.newCondition();
private int capcity;
public BlockingQueue(int capcity) {
this.capcity = capcity;
}
public T take(){
lock.lock();
try {
while (queue.isEmpty()){
try {
emptyWaitSet.await();
} catch (InterruptedException e) {
e.printStackTrace();
}
}
T t = queue.removeFirst();
fullWaitSet.signal();
return t;
}finally {
lock.unlock();
}
}
public void put(T element){
lock.lock();
try {
while(queue.size() == capcity){
try {
fullWaitSet.await();
} catch (InterruptedException e) {
e.printStackTrace();
}
}
queue.addLast(element);
emptyWaitSet.signal();
}finally {
lock.unlock();
}
}
public int size(){
lock.lock();
try {
return queue.size();
}finally {
lock.unlock();
}
}
}
|
一个简单的Blocking Queue就这样完成了,但我们的emptyWaitSet和fullWaitSet调用的是await()方法,他们会一直等待下去,现在我们要改进一下他们,当他们等待一段时间还拿不到这个任务就会放弃这个等待而不会永久阻塞,所以我们需要添加一个超时等待的方法
1
2
3
4
5
6
7
8
9
10
11
12
13
14
15
16
17
18
19
20
21
22
23
24
25
26
27
|
public T poll(long timeout, TimeUnit unit){
lock.lock();
try {
long nanos = unit.toNanos(timeout);
while (queue.isEmpty()){
try {
if(nanos <= 0){
return null;
}
nanos = emptyWaitSet.awaitNanos(nanos);
} catch (InterruptedException e) {
e.printStackTrace();
}
}
T t = queue.removeFirst();
fullWaitSet.signal();
return t;
}finally {
lock.unlock();
}
}
|
在Blocking Queue加上超时等待的方法,此时Blocking Queue已经完成了
编写Thread Pool
那么我们现在开始实现Thread Pool
1
2
3
4
5
6
7
8
9
10
11
12
13
14
15
16
17
18
19
20
21
22
| class ThreadPool{
private BlockingQueue<Runnable> taskQueue;
private HashSet<Worker> workers = new HashSet<>();
private int coreSize;
private long timeout;
private TimeUnit timeUnit;
public ThreadPool(int coreSize, long timeout, TimeUnit timeUnit, int queueCapcity) {
this.coreSize = coreSize;
this.timeout = timeout;
this.timeUnit = timeUnit;
this.taskQueue = new BlockingQueue<>(queueCapcity);
}
}
|
那么我们的线程池也编写完毕了
接下来,我们需要把生产者的生产的任务对象交给线程池,线程池中如果没有线程,那就创建线程来执行它,如果有线程但是数量不足,就把任务对象放入阻塞队列,接下来我们来实现一下这个方法
我们需要提供一个worker类来执行task
1
2
3
4
5
6
7
8
9
10
11
12
13
14
15
16
17
18
19
20
21
22
23
24
25
26
27
28
29
30
31
32
33
34
35
36
37
38
39
40
41
42
43
44
45
46
47
48
49
50
51
52
53
54
55
56
57
58
59
60
61
62
63
64
65
| class ThreadPool{
private BlockingQueue<Runnable> taskQueue;
private HashSet<Worker> workers = new HashSet<>();
private int coreSize;
private long timeout;
private TimeUnit timeUnit;
public void execute(Runnable task){
synchronized (workers){
if(workers.size() < coreSize){
Worker worker = new Worker(task);
workers.add(worker);
worker.start();
}else {
taskQueue.put(task);
}
}
}
public ThreadPool(int coreSize, long timeout, TimeUnit timeUnit, int queueCapcity) {
this.coreSize = coreSize;
this.timeout = timeout;
this.timeUnit = timeUnit;
this.taskQueue = new BlockingQueue<>(queueCapcity);
}
class Worker extends Thread{
private Runnable task;
public Worker(Runnable task) {
this.task = task;
}
@Override
public void run() {
while (task != null || (task = taskQueue.take()) != null){
try {
task.run();
}catch (Exception e){
e.printStackTrace();
} finally {
task = null;
}
}
synchronized (workers){
workers.remove(this);
}
}
}
}
|
到这里,线程池已经编写完毕,我们需要一个测试类来执行代码
完整代码如下
1
2
3
4
5
6
7
8
9
10
11
12
13
14
15
16
17
18
19
20
21
22
23
24
25
26
27
28
29
30
31
32
33
34
35
36
37
38
39
40
41
42
43
44
45
46
47
48
49
50
51
52
53
54
55
56
57
58
59
60
61
62
63
64
65
66
67
68
69
70
71
72
73
74
75
76
77
78
79
80
81
82
83
84
85
86
87
88
89
90
91
92
93
94
95
96
97
98
99
100
101
102
103
104
105
106
107
108
109
110
111
112
113
114
115
116
117
118
119
120
121
122
123
124
125
126
127
128
129
130
131
132
133
134
135
136
137
138
139
140
141
142
143
144
145
146
147
148
149
150
151
152
153
154
155
156
157
158
159
160
161
162
163
164
165
166
167
| @Slf4j(topic = "c.ThreadPool")
class ThreadPool{
private BlockingQueue<Runnable> taskQueue;
private HashSet<Worker> workers = new HashSet<>();
private int coreSize;
private long timeout;
private TimeUnit timeUnit;
public void execute(Runnable task){
synchronized (workers){
if(workers.size() < coreSize){
Worker worker = new Worker(task);
workers.add(worker);
worker.start();
}else {
taskQueue.put(task);
}
}
}
public ThreadPool(int coreSize, long timeout, TimeUnit timeUnit, int queueCapcity) {
this.coreSize = coreSize;
this.timeout = timeout;
this.timeUnit = timeUnit;
this.taskQueue = new BlockingQueue<>(queueCapcity);
}
class Worker extends Thread{
private Runnable task;
public Worker(Runnable task) {
this.task = task;
}
@Override
public void run() {
while (task != null || (task = taskQueue.take()) != null){
try {
task.run();
}catch (Exception e){
e.printStackTrace();
} finally {
task = null;
}
}
synchronized (workers){
workers.remove(this);
}
}
}
}
class BlockingQueue<T>{
private Deque<T> queue = new ArrayDeque<>();
private ReentrantLock lock = new ReentrantLock();
private Condition fullWaitSet = lock.newCondition();
private Condition emptyWaitSet = lock.newCondition();
private int capcity;
public BlockingQueue(int capcity) {
this.capcity = capcity;
}
public T poll(long timeout, TimeUnit unit){
lock.lock();
try {
long nanos = unit.toNanos(timeout);
while (queue.isEmpty()){
try {
if(nanos <= 0){
return null;
}
nanos = emptyWaitSet.awaitNanos(nanos);
} catch (InterruptedException e) {
e.printStackTrace();
}
}
T t = queue.removeFirst();
fullWaitSet.signal();
return t;
}finally {
lock.unlock();
}
}
public T take(){
lock.lock();
try {
while (queue.isEmpty()){
try {
emptyWaitSet.await();
} catch (InterruptedException e) {
e.printStackTrace();
}
}
T t = queue.removeFirst();
fullWaitSet.signal();
return t;
}finally {
lock.unlock();
}
}
public void put(T element){
lock.lock();
try {
while(queue.size() == capcity){
try {
fullWaitSet.await();
} catch (InterruptedException e) {
e.printStackTrace();
}
}
queue.addLast(element);
emptyWaitSet.signal();
}finally {
lock.unlock();
}
}
public int size(){
lock.lock();
try {
return queue.size();
}finally {
lock.unlock();
}
}
}
|
编写测试类
我们在源代码上加一些输出,方便我们观察结果
1
2
3
4
5
6
7
8
9
10
11
12
13
14
15
16
17
18
19
20
21
22
23
24
25
26
27
28
29
30
31
32
33
34
35
36
37
38
39
40
41
42
43
44
45
46
47
48
49
50
51
52
53
54
55
56
57
58
59
60
61
62
63
64
65
66
67
68
69
70
71
72
73
74
75
76
77
78
79
80
81
82
83
84
85
86
87
88
89
90
91
92
93
94
95
96
97
98
99
100
101
102
103
104
105
106
107
108
109
110
111
112
113
114
115
116
117
118
119
120
121
122
123
124
125
126
127
128
129
130
131
132
133
134
135
136
137
138
139
140
141
142
143
144
145
146
147
148
149
150
151
152
153
154
155
156
157
158
159
160
161
162
163
164
165
166
167
168
169
170
171
172
173
174
175
176
177
178
179
180
181
182
183
184
| @Slf4j(topic = "c.TestPool")
public class TestPool {
public static void main(String[] args) {
ThreadPool threadPool = new ThreadPool(2,1000,TimeUnit.MILLISECONDS,10);
for(int i = 0; i < 5;i++){
int j = i;
threadPool.execute(()->
{
log.debug("{}",j);
});
}
}
}
@Slf4j(topic = "c.ThreadPool")
class ThreadPool{
private BlockingQueue<Runnable> taskQueue;
private HashSet<Worker> workers = new HashSet<>();
private int coreSize;
private long timeout;
private TimeUnit timeUnit;
public void execute(Runnable task){
synchronized (workers){
if(workers.size() < coreSize){
log.debug("新增 worker{},{}",workers,task);
Worker worker = new Worker(task);
workers.add(worker);
worker.start();
}else {
log.debug("加入任务队列{}",task);
taskQueue.put(task);
}
}
}
public ThreadPool(int coreSize, long timeout, TimeUnit timeUnit, int queueCapcity) {
this.coreSize = coreSize;
this.timeout = timeout;
this.timeUnit = timeUnit;
this.taskQueue = new BlockingQueue<>(queueCapcity);
}
class Worker extends Thread{
private Runnable task;
public Worker(Runnable task) {
this.task = task;
}
@Override
public void run() {
while (task != null || (task = taskQueue.take()) != null){
try {
log.debug("正在执行...{}",task);
task.run();
}catch (Exception e){
e.printStackTrace();
} finally {
task = null;
}
}
synchronized (workers){
log.debug("worker 被移除{}",this);
workers.remove(this);
}
}
}
}
class BlockingQueue<T>{
private Deque<T> queue = new ArrayDeque<>();
private ReentrantLock lock = new ReentrantLock();
private Condition fullWaitSet = lock.newCondition();
private Condition emptyWaitSet = lock.newCondition();
private int capcity;
public BlockingQueue(int capcity) {
this.capcity = capcity;
}
public T poll(long timeout, TimeUnit unit){
lock.lock();
try {
long nanos = unit.toNanos(timeout);
while (queue.isEmpty()){
try {
if(nanos <= 0){
return null;
}
nanos = emptyWaitSet.awaitNanos(nanos);
} catch (InterruptedException e) {
e.printStackTrace();
}
}
T t = queue.removeFirst();
fullWaitSet.signal();
return t;
}finally {
lock.unlock();
}
}
public T take(){
lock.lock();
try {
while (queue.isEmpty()){
try {
emptyWaitSet.await();
} catch (InterruptedException e) {
e.printStackTrace();
}
}
T t = queue.removeFirst();
fullWaitSet.signal();
return t;
}finally {
lock.unlock();
}
}
public void put(T element){
lock.lock();
try {
while(queue.size() == capcity){
try {
fullWaitSet.await();
} catch (InterruptedException e) {
e.printStackTrace();
}
}
queue.addLast(element);
emptyWaitSet.signal();
}finally {
lock.unlock();
}
}
public int size(){
lock.lock();
try {
return queue.size();
}finally {
lock.unlock();
}
}
}
|
接下来我们执行代码

可以看到结果,由于我们没有使用超时时间,线程池执行完5个任务后,程序并没有结束,而是一直在等待任务的加入,那么现在我们再来看一下有超时等待的方法
我们将worker类的run方法修改一下
1
2
3
4
5
6
7
8
9
10
11
12
13
14
15
16
17
18
19
20
21
| @Override
public void run() {
while (task != null || (task = taskQueue.poll(timeout,timeUnit)) != null){
try {
log.debug("正在执行...{}",task);
task.run();
}catch (Exception e){
e.printStackTrace();
} finally {
task = null;
}
}
synchronized (workers){
log.debug("worker 被移除{}",this);
workers.remove(this);
}
}
|
现在我们修改了代码后再运行测试

可以看到当这次等待时间超过之后,线程池就会将线程移除,停止程序。
到目前已经自定义了一个线程池,下次将是线程池拒绝策略的一些实现